Easy Granny Square Afghan!


This cuddle afghan is a fun winter project.  You crochet it in squares and then slip stitch the squares together to make the size of afghan you want.  I followed the instructions from one of my favorite blogs  A Farm Wife's Journal.
  
http://farmwifejournal.blogspot.com/2012_09_01_archive.html

Follow her instructions to start your Afghan.  I deviated from the pattern by using variegated yarn till the square measured four inches.  Then, I connected to the black yarn and crocheted five rounds till the square measured about ten inches.  I then slip stitched the squares together.


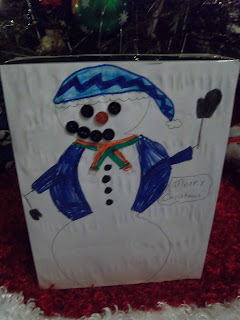
Snowmen Teacher Gift!


It’s that time of year when we search for the perfect gift for our kid’s teachers.  At parent conferences our child's teacher explained that because of budget cuts she would have to skimp on homework this year and would be buying more paper with her own money before the year was out.  

To help out we bought each of our kid’s teachers a packet of computer paper.  I then had each of my children design their own snowman.  


We then mounted them onto the copy paper. You can either stick a Christmas tag on the paper so the teacher knows who the gift is from or have your children design a card. This was a fun way to spend a snowy Saturday afternoon!

Blog Hop Give-Away!

The winner of our blog give away is Cherilyn!  Thank you everyone one who entered!

Hi everyone! We are a new blog that focus’ on all things crafty! Thank you Quilter’s Blog Hop Party for letting us join the party starting on December 10th ending on December 14th at 5:00 pm Mountain Standard time.

Blog Hop Party with Give-Aways
To win simply become a member of our blog and leave a comment with your favorite homemade Christmas gift.  One lucky winner will win this cute kit to make a sparrow pincushion!


*If the original winner does not respond in a week after the contest ends an alternate will be chosen.
Pin It

Cowboy Quilt!


This fun cowboy quilt was made from my stash for my soon to arrive nephew.  I sewed nine 12” blocks and put them together.  This quilt consists of four star blocks and five framed blocks.  Here is a quick link for the star block:


** Since I was working from my stash I made some alterations to the pattern to work with the fabric I had.  I left the square blocks whole instead of having to find another fabric to add to the quilt.


Four of the framed squares I cut the animal fabric to an 8” square and then framed it with black 5”X 15” strips and trimmed the squares to 12”.
The middle square I cut the cowboy fabric to 10” and then framed it with black 4” X15” strips and trimmed the square to 12”.

Once all the blocks are trimmed to 12” piece together and have fun quilting!  


Jean Pocket Turkey's!


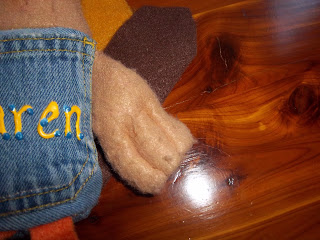
My sister made these fun Thanksgiving turkey’s from old blue jeans.  She placed a few crayons in the pocket and set them on the table with a place mats the kids could color. To make the turkey she cut out the back pocket of kids blue jeans.  Then cut out a turkey shaped head from brown felt and with right sides facing she attached it to the blue jeans.  Do this step with the front and the back.

  Next, again with brown felt she cut out four turkey wings.  She sewed them with right sides together.  Then turning them inside out she stuffed the wings and top stitched on the creases in the wings.  Next, baste the wings to the right side of the jeans with a pocket. 

For the legs she cut out different lengths of orange felt about ½ inch wide.  She cut out four feet and again sewed them right sides together, turned and stuffed them and sewed the makings. She tied and knot in the legs to create knees. She then basted these right sides facing on the bottom front of the jeans with the pocket.

 For the face she sewed on a beak and gobble and two bead eyes. 

 Cut a moon shape out of the brown felt.  Out of different colored felt cut out feather shapes.  Sew the feathers in alternating colors onto the moon shape of brown felt.  Sew the the brown moon shaped felt with the feathers facing out on the blue jean without the pocket.  Now with right sides facing sew the front and the back together make sure the feathers wings and legs are tucked in and you don’t snag them as you sew.  Leave a small opening to turn the turkey inside out and stuff.  

For the Hair simple sew on yarn with a needle using loop stitches.
 If you want your feathers to stand up you can sew them with a tack stitch to the back of the blue jeans.  

 To personalize use puff paints to write the child’s name on the front of the pocket.

Halloween Haunted Candy Houses!


We love to make Haunted Candy Halloween Houses, especially this time of year when an excess of candy seems to abound.  We used orange frosting to “glue” the graham cracker pieces together to create our houses.  Then, the kids got creative and loaded their houses (and mouths) up with candy.  This is a great way to spend an evening together as a family or for a Halloween party.  

Fall Fun Ideas!


 I thought I would share some of my favorite things to pull out every year and display in my home.  


I thought I would share with you these cute Halloween postcard quilts my sister made me.  I love this idea because you can write a fun message on the back and then I personally pull these quilts out every year to display on my mantle. 

Another fun idea is this broom and hat sign.  I painted a left over piece of wood purple and then out of scrap booking paper cut out the words hat and broom. 

I found the knobs at a local craft store and painted them black and then glued them to the board.  Finally I added black ribbon to the hat and broom and hung them on the sign. 

I love pulling out this wreath every fall to hang on my door.  I found the leaves and wreath at a local craft store and then add the scarecrow.  The welcome is a removable sticker I found at my dollar store.  

Also, every year I let my kids save some of their favorite fall crafts they have made.  They love pulling them out the next year and displaying them again!  

Ghost, Pumpkin, Spider Halloween Quilt!


 A few years back I saw a cute Halloween quilt that I wanted to recreate for my own home.  This is my version of that quilt.  I would love to give credit to the original designer, but I honestly can’t remember where I saw this quilt.  So, if anyone knows leave me a message and I’ll provide a link to the original design.  This Halloween quilt was fun and really easy to make.  Simply decide how big you want your quilt and then use squares and half triangle squares to make the ghost and pumpkin. *Make sure your squares and half square triangles are the same size. 

Row 1:   Is all blue squares the same size

Row 2:  have one blue square then two blue and white half square triangles to make the top of the ghost head

Row 3:  Is one blue square, and three white squares

 Row 4:  Is one blue and white half square triangle, one white and orange half square triangle, one orange triangle, one orange and white half square triangle

Row 5:  Is one blue and white half square triangle, one white and orange half square triangle.  One orange triangle and one orange and white half square triangle

I bordered the quilt with green fabric.

For the face on the ghost and the pumpkin I traced the design on the back of the black fabric and cut out two pieces.  I sewed them together with right sides facing, then flipped and ironed the pieces.  I hand sewed the pieces closed.  I stitched them to the quilt using the stitch in a ditch method.  Next, using  black DMC floss I stitched a spider web in the upper corner and a spider in coming from the ghost. 
Have fun with your quilt and add any embellishments you want!

This quilt is also a part of the quilt fall festival:
http://amyscreativeside.com/2012/10/26/bloggers-quilt-festival-fall-2012/

Pin It

Halloween Gingerbread Men!


As the first chill in the air hit, on came the Christmas music and my five year old daughter begging to make sugar cookies (or shape cookies as she calls them).  She insisted on pulling out all the cookie cutters, so in the middle of the Easter bunny, pumpkin, and gingerbread man I tried to figure out how we could make these shapes fit in with the Halloween season.  It turned out the gingerbread men work really well as:


mummies 

or ghosts 

or a simple monster. 

*For the mummy Cookie I frosted the cookie with white frosting and then put on two chocolate chips for the eyes.  Using a pedal decorating tip I placed the frosting on the cookie in rows going from left to right and then right to left.

**For a fun Halloween Party idea, make a batch of sugar cookies shaped like gingerbread men.  Then, provide different colored frosting and candies and let the kids make their own Halloween Monster cookie.


Pin It

Crochet Animal Finger Puppets!


I have got the crochet bug!  These fun finger puppets were fast and easy to crochet.  I made seven sets for a “busy bag” exchange.   For those of you who don’t know:  in a “busy bag” exchange you get a group together where each of you comes up with a fun activity for kids to do that will fit in a bag.  My activity was these Old MacDonald finger puppets.  The kids can use the puppets to sing the song, or if your kids are like my daughter the puppets became her friends and for an hour she was lost in the wonderful world of make believe!

Here is how I made the puppets. 

First, I just used yarn from my stash and tried to think of what animals the yarn could represent.  (Hence the black cow, my son really wanted the black yarn to be a cow.)

I used a 5.50mm hook, you can adjust the amount of stitches based on the size of hook you choose.  Just remember your first chain needs to be big enough that fingers can fit through.

1.    Chain 10

2.    Connect the chain by single crocheting in the first crochet you made.  This makes a circle.  You will now work in a round.

3.   Double crochet in each of the crochets around the circle.

4.   Connect with first double crochet.

5.   Chain 3.  Repeat instructions 3-4 twice.  This will give you three rows of double crochet.

6.   Single crochet in every other crochet until you close the circle.  Tie off and pull extra yarn to inside of puppet.

Now you have your basic puppet shape.  I used puff paint to paint on the different animal faces.  Just make sure the paint dries before you or your little ones start to play.


Pin It

Twirly Bunny!


This cute bunny was fun to make!  I used the bunny pattern from Lion Brand yarn with a few modifications.  Here is the website for the bunny pattern:

Here are the modifications:
Follow the instructions for the bunny body till round 6-8. 
1.   SC in the back stitch of every crochet until you finish the round.
2.   Ch 3
3.  Make two double crochet in back of next SC
4.  Ch1
5.  *Skip next stitch and make 3 double crochet in following stitch.  Ch1.  Repeat from *till you complete the round.
6.   Ch 3
      7.   *Make 3 double crochets in the opening created by your 1 Ch.  Repeat from * till you complete the round.
     8.   Repeat steps 6&7 twice.  Fasten off.
     9.   Go back to the bear pattern and finish the single crochet around the top of the skirt to make the rest of the body.

Next, I made a flower for the bunny’s ear.  I made the flower using 7/1.66mm hook and DMC floss.  To make the flower:
Ch2.
Rnd 1:  Work 6sc in first ch.  Place marker in first stitch for beginning of rnd, move marker up each rnd.
Rnd 2:  Work 2 sc in each st around -12sc
Ch 3 in next stitch
Dc twice in same stitch
*Ch1.  Skip next stitch and dc three times in following stitch.  Repeat from * till you complete the round.  Fasten off and sew to bunny.
Pin It

Gooey Guilt Free Chocolate Brownies!


These Yummy brownies are very addicting!  The pumpkin makes the brownies super moist and without the oil or eggs - Guilt Free!

What you need:

1 chocolate cake mix
1 small can of pumpkin
1 cup of marshmallows
1 t vanilla
2 T of butter softened
2 T cocoa powder
2 C powdered sugar
¼ C milk

Preheat oven to 350

In a mixing bowl beat on high the cake mix and pumpkin till blended.
With a spatula pour into greased 9X13 baking pan (I used fat free cooking spray for the grease).   Bake for 30 minutes.  Take out of oven and sprinkle marshmallows on top.  Bake five more minutes till marshmallows puff up and brown on top.  Remove from oven and cool.  In a small bowl add vanilla, butter, cocoa powder, and sugar.  Gradually while mixing add milk to you reach desired frosting consistency (you may need to add more milk, if your frosting is too runny add more powdered sugar).  Spread on top of cooled brownies. 
Enjoy all the gooey goodness without any of the guilt!

Makes 16
Pin It

Flower Pencils!


These fun pencils make a perfect center piece for a garden party  or a teacher gift!  First cut a scalloped circle on top with another smaller scallop on top, then cut out a small circle and stamp with a fun print.  You can also, ink the edges of the circle for extra depth.  Place in a canning jar with shredded tissue paper.  Tie a cute ribbon around the top of the jar. 

Pin It

Halloween Sucker!


Here is a really easy Halloween treat. I took a sucker and then made a topper for it. I took a Quickutz ghost treat bag die that I had and then glued it on to a circle. Next, I glued that onto a Sizzix Circle, Scallop #2 and taped it onto my sucker. Last of all I tied a black ribbon around the sucker stick. It was super easy and fun to make.

Pin It

Birthday Card!


I love to have homemade cards on hand for when I give away a present. I usually write my note on a sticky note and put that inside the card. Then the card is part of my present and the person I gave the gift to can reuse it if they want. All they have to do is take the sticky note out. Here is a birthday card I made. It was fun to replace the i's in "Big Wish" with balloons!

Pin It