Cute Valentine's Wreath!

Make a fun wreath with Christmas clearance. 

 I found these glitter red leaves and purple ribbon in the after Christmas sales.  The leaves were 90% off and the ribbon was 75% off, so this wreath cost only $5.00 to make.   To make this wreath use a left over Christmas wreath form.  (I saved the metal frame from my pine wreath to re-use).  Then, I wrapped the wire leaf stems to the metal wreath from.  At the bottom of the wreath I tied on the purple ribbon. To finish off, I sewed on a red heart button from my stash.

Pin It

Twirlly Bear!


I made this cute bear for my niece’s birthday.  I used the bear pattern from Lion Brand yarn with a few modifications.  Here is the website for the bear pattern:


http://www.lionbrand.com/patterns/70704AD.html?noImages=0

Now here are the modifications:

Follow the instructions for the bear body till round 8-17.  This is where you will add the skirt.  Sc in each st around till you get to round 12.

1.   Sc in the back stitch of every crochet until you finish the round.

2.   Ch 3

3.    Make two double crochet in back of next SC.

4.   Ch 1

5.   * Skip next stitch and make 3 double crochet in following stitch. Ch 1.  Repeat from * till you complete the round.

6.   Ch 3

7.   *Make 3 double crochets in the opening created by your 1 ch.  Repeat from * till you complete the round.

8.   Repeat steps 6 & 7 twice.  Fasten off.

9.   Go back to the bear pattern and finish the single crochet around the top of the skirt to make the rest of the body.


Next, I made a flower for the bear’s ear. I made the flower using a 7/1.66mm hook and DMC floss.  To make the flower:

ch 2.
Rnd 1: Work 6 sc in first ch. Place marker in first stitch for beginning of rnd, move marker up each rnd.
Rnd 2: Work 2 sc in each st around –12 sc

ch 3 in next stitch

dc twice in same stitch

*ch 1.  Skip next stitch and dc three times in following stitch.  Repeat from * till you complete the round.  Fasten off and sew to bear.
Hot Items at CreateForLess 
Pin It


Fun Valentine Block Letters!


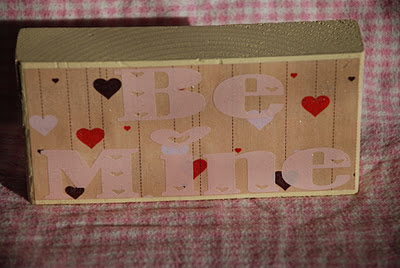
This is a fun and easy Valentine Block you can do with your kids. I went in the garage and found left over wood blocks from one of my husband's projects. I sanded down any rough edges and then painted the blocks. Next, I put on vinyl lettering that I cut using my Silhouette.  I found cute paper from SEI and cut it to fit the blocks.  You can also decorate your blocks using any stickers you want.  Then I brushed Mod Podge over the whole block and pressed the paper down and rubbed it firmly to get rid of all the bubbles. I put on another layer of Mod Podge and then my 5 year old daughter loved sprinkling glitter over the blocks to make them sparkle. You could do these blocks for all the holidays by just switching the paper and stickers you use. I have fallen in love with Mod Podge. A couple of tips when using it is that it goes on white but dries clear and the glitter will stick to the Mod Podge if you put it on while wet and then let it dry.

Pin It

Card Party!

I get together with friends and do a card exchange. We each design a card and then bring all the supplies for everyone in the group to make five of the same card. That way we have four cards to give away and one to keep for ideas from each person. Here are three of the cards I have designed: The turtle card was made with Quickutz and the stamp was from Stampin Up! The animal cards were made from Stampin Up! Hostess Long Fellows stamps. The cupcake I cut out with my Silhouette.

Pin It

Candy Jar!


Recycle and old glass jar into a fun valentine’s candy jar! 
I had a glass jar from a sweet and sour sauce. 

I simply found some cute paper from my stash and mod podge it onto the jar. 


 I also, mod podged on some cute ribbon around the lid and a butterfly paper punch to the top. 

Then, I filled the jar with some of my family’s favorite candy!  This is also a cute way to give a valentine gift to friends, neighbors or teachers.

Have fun recycling some of your old jars!
Pin It

Cute Owl Valentine's!


These cute Owl valentines are fun to make!  I love to leave a little surprise for my kids to find on the table when they wake up on valentines.  My kids will love these owls filled with their favorite treat on Valentine’s Day.

For the Blue Owl I used a Wilton party favor bag.

For the Red and Green owl I used two different paper box templates I found and printed off onto cardstock.  Here is the website for the templates:


To make the owls, I used a quick kutz circle die.  I used my Cuttlebug to make cutting out the circles easier.  If you don’t have any tools, simple trace around a bottle cap and cut out your own circles.

Next, I cut the circles in half and used double sided tape to layer the half circles on the bag. Then, I just cut out wings, beak, and feet with my extra paper and glued them onto the owl.  Last, I used what I had to make the eyes. 

I came up with the three following sayings to go with the valentines theme:

I will “owl-ways” love you!

I will “owl-ways” be your friend!

I will “owl-ways” be there for you!

Have fun making these owls and coming up with your own sayings!

AmericanGreetings.com
Pin It


Cute owl ipod/phone cover!

I wanted to have a cute cover for my Ipod so it wouldn’t get scratched in my purse.  This owl cover is similar to the flower cover and takes only a couple hours to make!
Materials:
F5 or 3.75mm hook
  Light blue weight yarn
Black yarn
Royal blue yarn
White yarn
Orange yarn
To make front cover:
1.   Chain 15 from light blue yarn
2.    Double crochet in 2nd chain from the hook
3.   * chain 3.  Turn.  Double Crochet in first chain from the hook and every chain across the row.  Repeat from * till you have 10 rows.
4.   Fasten off

To make back cover:
5.   Repeat steps 1-4 to make back of cover.
6.   Start at the top corner and slip stitch the front to the back around both sides and bottom.

To make eyes:
1.   Chain 3 with black yarn.  Slip stitch in first chain to make a circle.
2.   Chain 1.  Place a marker so you know where you started this round. * Single crochet in next crochet.  Chain 1.  Repeat from * till you have gone around the circle.  Slip stitch to next chain. Move your marker.
3.   Switch to royal blue yarn.  Chain 1. 
4.   * single crochet in next chain. Chain 1.  Repeat from * till you finish the round and reach your marker.
5.   Move your marker up to hook. 
6.   Switch to white yarn. * Chain 2 single crochet.  Double crochet twice in next stitch.  Repeat from * till you reach marker and finish round. 
7.   Slip stitch with next crochet.  Fasten off and hide threads.
8.   Repeat for second eye.
 Owl’s beak:
1.    With orange yarn chain 6.
2.   Chain 1. Turn.  Single crochet across row.
3.   Chain 1.  Turn. Single crochet in second stitch from hook.  Single crochet in next single crochet.
4.   Chain one.
5.   Fasten off.  Hide threads
6.   Sew eyes and beak on cover.

This cover will stretch to fit most I pods and phones.

Pin It

Easy to make Ipod/phone cover!


I wanted to have a cute cover for my Ipod so it wouldn’t get scratched in my purse.  This cover takes only a couple hours to make!

Materials:

F5 or 3.75mm hook

 White 2 ply 56.7 gram yarn

Variegated green yarn

Variegated pink yarn

To make front cover:

1.   Chain 15

2.    Double crochet in 2nd chain from the hook

3.   * chain 3.  Turn.  Double Crochet in first chain from the hook and every chain across the row.  Repeat from * till you have 10 rows.

4.   Fasten off


To make back cover:


5.   Repeat steps 1-4 to make back of cover.

6.   Start at the top corner and slip stitch the front to the back around both sides and bottom.


To make flower:

1.   Chain 3 with green variegated yarn.  Slip stitch in first chain to make a circle.

2.   Chain 1.  Place a marker so you know where you started this round. * Single crochet in next crochet.  Chain 1.  Repeat from * till you have gone around the circle.  Slip stitch to next chain. Move your marker.

3.   Switch to pink variegated yarn.  Chain 2.  Double crochet in same chain

4.   * Double crochet three times in next chain.  Repeat from * till you finish the round and reach your marker.

5.   Move your marker up to hook. 

6.   * Chain 3 single crochet in next stitch.  Repeat from * till you reach marker and finish. 

7.   Slip stitch with next crochet.  Fasten off and hide threads.

8.   Sew flower on the cover.


This cover will stretch to fit most I pods and phones.
Pin It

Yummy BLT Pizza!


This yummy BLT pizza is the perfect good for you snack, with less than 200 calories. Plus, it only takes about 10 minutes to make.
What you need:
Refrigerated roll dough
2t Spicy Mustard
1 T   Real Bacon Bits
1 T diced Tomatoes
Skim Mozzarella Cheese Stick
 ½ c shredded Iceberg Lettuce
1 t Ranch Dressing (optional)
Preheat oven to 400 degrees
1.    Thaw one roll.  Either 10 minutes on counter or 4 seconds on defrost in the microwave. 
2.   Spray a cookie sheet with nonstick cooking spray
3.   Flatten your dough to make a circle.
4.   Spread on mustard
5.   Sprinkle on 1 T of Bacon Bits
6.   Sprinkle on Tomato
7.   Break up half of a cheese stick and sprinkle on top. (You can add the whole cheese stick, but your calories will change.)
8.   Bake for five minutes.  Till crust is brown on edges.
9.   Top with lettuce and Ranch
Enjoy!

Seasons Temple Picture


I wanted a new way to display the temple in my home that went along with each Season of the year.  I bought the frame at Walmart for only $3.00.  Then, I placed the Seasons sticker in the middle of the frame (I just printed that on my computer).  The pictures are of the Salt Lake Temple in the different Seasons:  Winter, Spring, Summer, and Fall.   The pictures are free for non-commercial use on LDS.org.  They have a ton of pictures from the temples around the world.   Here is the website I found these pictures on:  http://lds.org/media-library/images/categories/temples?lang=eng

 I thought this would make a good wedding gift or just a fun way to display the temple in our home.

Pin It

Easy to make Character Cakes!


When my children wanted character cakes for their birthday, I couldn’t believe the prices the bakery charges.  I knew I could make a similar cake for around five bucks. 

Character Cakes are easier to make than you might think.  I search the web for free coloring page sites with the character my kids want.  For this Mario cake, I printed a coloring page and mounted it on cardboard and “colored” in the lines with frosting using a basic star tip. I didn’t let my kids eat the frosting off the Mario because of the ink, but they still enjoyed the cake and cupcakes.


 Click to View My Album
 

For my son’s Star Wars Birthday, I again used a coloring page for my basic design idea.  Using a straight tip I just drew on the design I had found online.  Then, to top it off I added a few Star Wars toys.  My kids love to pick out toys for the top of their cake and since they didn’t come from the bakery, they are higher quality and don’t break as easily.


I really didn’t want my three year old daughter to have a ton of frosting for her birthday.  She gets really hyper with lots of sugar. I simply printed off the Strawberry Shortcake poster mounted it on clean cardboard and using a star tip created a border around the cake.  She loved it and I didn’t have to deal with her wanting to lick all the frosting off the cake!

MattelShop.com
15% off EVERYTHING from Mattel Shop! Use Promo code: FEB15OFF (Expires 2/29/12)


Pin It

Easy to make Quilt Rack!

I wanted to display my seasonal wall hangings, without spending a lot of money on a quilt rack. This quilt rack cost less than $10.00. Here’s how to make one for your own home:
Supplies- 
Pine board (36” long)
Dowel rod (48” long)
Two open ended hooks
Package of café hooks
Black paint
A vinyl lettering saying


1.    Paint the board, dowel rod and two hooks black.  Let dry.

2.   Screw an open hook 6” from the end of the board.  Repeat with the other hook at the opposite end of the board.

3.   Apply your favorite vinyl lettering saying (note: if you do not have vinyl lettering, you can use a stencil and trace your saying onto white contact paper and get a similar effect.  Remember to trace the letters backwards on the wrong side of the contact paper so they will come out facing the right way when you flip and stick them to the board)

4.   Place about four café hooks onto the dowel rod and then slide the dowel rod onto the open ended hooks.

I love this quilt rack, because the café hooks allow me to hang different size quilts.  You simply use as many hooks as you need for your quilt to hang straight.

Pin It

Melt In Your Mouth Glazed Mini Doughnuts!

                                           
                                               These yummy doughnut melt in your mouth!

I love my mini doughnut maker and these doughnuts are so easy to make and taste like the chocolate version of krispy kreme doughnuts!  First, Make your favorite chocolate cake mix recipe (I used a box cake mix).  Make your doughnuts as usual either in a maker or in the oven.  As soon as your doughnuts are done and still hot put them in the following glaze:
1lb powdered sugar
1 teaspoon vanilla
1/2 cup of boiling water
whisk till powdered sugar is blended.
I usually just dump the whole batch in the bowl and use a fork to flip and coat both sides.  Then, let them rest on a cookie rack till the glaze hardens!
Enjoy!
**I also, don't like to make a whole batch at once because I will eat them all!  So, when I have as much doughnuts as my family will eat.  I put the left over cake mix in a Ziploc bag and freeze for the next time we want doughnuts.  Simple, thaw the bag for a few minutes in the microwave if your in a hurry or on the counter for about twenty minutes and make another batch of doughnut.  They work just the same as the first day you made your cake mix.

Shopko's HUGE Kitchen SALE! 25-50% Off Cookware, Bakeware, & Drinkware. Plus, All Appliances are on Sale!

Pin It

Butterfly mobile!

 
 Click to View My Album

                                        Cute Butterfly Mobile!

My sister in law and I saw this mobile in a specialty store and thought it was adorable.  Then, we looked at the sixty dollar price tag!  I knew I could re-create it for much less.

1.    Cover an old embroidery hoop with ribbon by looping the ribbon around the hoop tightly and then fasten the end with glue from a glue gun.


2.   Next using fishing line or wire (I used a purple wire) to create an x in the center of the hoop.  Simple wrap the wire around two sides and then again around opposite sides and you should have an x in the middle of the hoop. 

 Click to View My Album http://www.snapfish.com/default/images/email/Share/albumBground/top_right_corner.jpg


3.   Now it is time to make the butterflies.  I used a Martha Stewart butterfly punch but you can use any punch you want.  You need to punch out 106 butterflies out of your colored paper and then another 106 butterflies out of your clear paper.

4.    To string the butterflies use light weight thread or fishing line (I use fishing line, because it is less noticeable).  Cut a 25” piece of fishing line.  Thread a needle with the fishing line, then thread a clear and colored butterfly in the middle (make sure the colored paper is facing out).  Pull the butterfly to the top of your string leaving about two inches at the top.  Then, with your needle make a knot in the fishing line so that your butterfly won’t slip.  Continue adding butterflies every few inches till you have six butterflies on your fishing line.  Make sure your last butterfly is at the bottom of your string.

5.   Tie this string to the middle of your x.  This should be your longest string. 

6.   Repeat step four except cut your fishing line to 20” and add 9 butterflies.  Tie this string to one of the wires about two to three inches from the middle of the x on one of the sides going towards the hoop.  Repeat this step till you have a string tied to each of the arms of the x.  This is your inner layer of butterflies.

7.   Repeat step four except cut your fishing line to 15” and add 8 butterflies.  Tie this string to one of the wires about two to three inches from your 20” string.  Repeat this step till you have a string tied to each of the arms of the x.  This is your middle layer.

8.   Repeat step four except cut your fishing line to 10” and add 7 butterflies.  Tie this string to one of the wires next to the embroidery hoop.  Repeat this step till you have a string tied to each of the arms of the x.  This is your outer layer.

9.    Cut four ribbons to the length you want the mobile to hang.  Tie the four ribbons to outside of the hoop in each section created by your x and make a large bow to hang up your mobile.

Pin It