Cute Owl Valentine's!


These cute Owl valentines are fun to make! I love to leave a little surprise for my kids to find on the table when they wake up on valentines. My kids will love these owls filled with their favorite treat on Valentine’s Day.
For the Blue Owl I used a Wilton party favor bag.
For the Red and Green owl I used two different paper box templates I found and printed off onto cardstock. Here is the website for the templates:
To make the owls, I used a quick kutz circle die. I used my Cuttlebug to make cutting out the circles easier. If you don’t have any tools, simple trace around a bottle cap and cut out your own circles.
Next, I cut the circles in half and used double sided tape to layer the half circles on the bag. Then, I just cut out wings, beak, and feet with my extra paper and glued them onto the owl. Last, I used what I had to make the eyes.
I came up with the three following sayings to go with the valentines theme:
I will “owl-ways” love you!
I will “owl-ways” be your friend!
I will “owl-ways” be there for you!
Have fun making these owls and coming up with your own sayings!


I love to have homemade cards on hand for when I give away a present. I usually write my note on a sticky note and put that inside the card. Then the card is part of my present and the person I gave the gift to can reuse it if they want. All they have to do is take the sticky note out. Here is a birthday card I made. It was fun to replace the i's in "Big Wish" with balloons!
Cute Butterfly Mobile!
 My sister in law and I saw this mobile in a specialty store and thought it was adorable. Then, we looked at the sixty dollar price tag! I knew I could re-create it for much less.
Here are a few fun ways to say “Thank You”

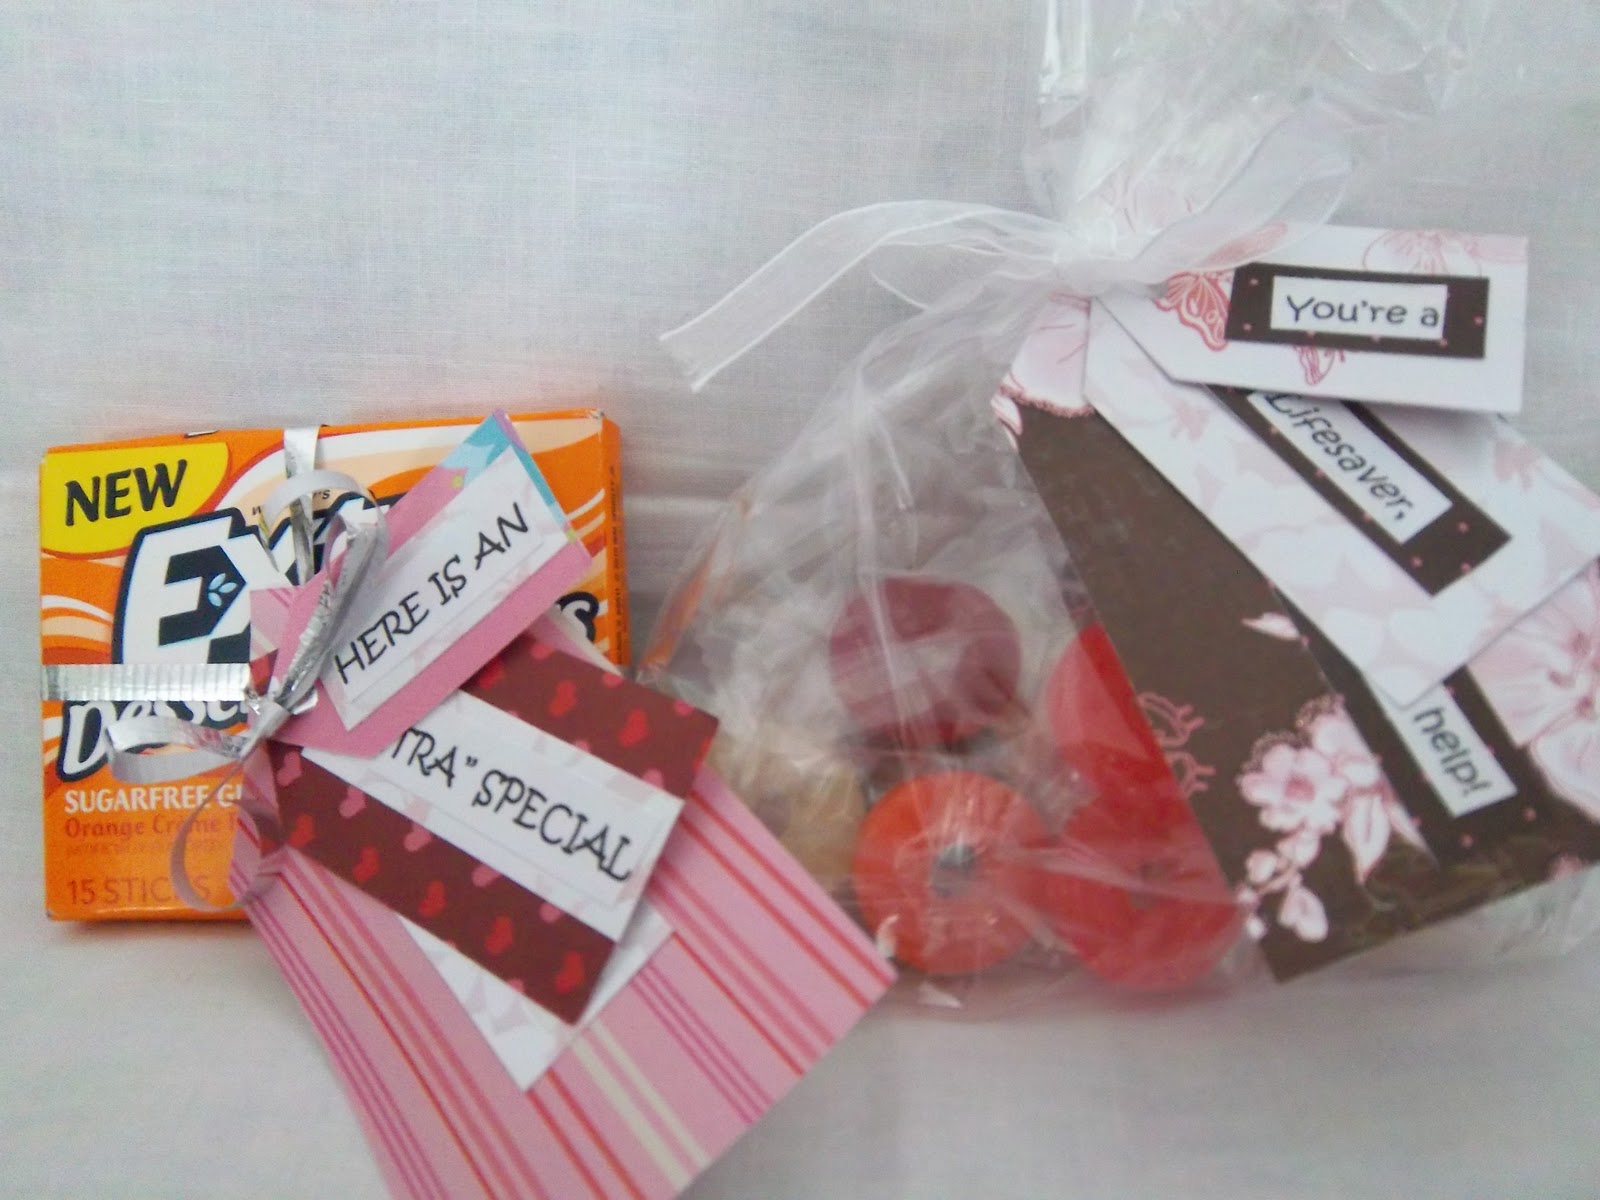
I used a die cut to cut out three tags and then stacked the tags and attached to a bag of “Lifesaver’s”. The saying is “Thanks for your help. You’re a Lifesaver!”


For this idea again I cut out three tags and then stacked the tags with the attached saying. “Thank you for your “Extra” special help!” Then, I tied it to a pack of Extra gum.

A few more candy sayings:
Use mound bars and say “Thanks a “Mounds” for all your help!”
Use a 100 grand bar and say “You’re worth a 100 grand. Thanks for all your help!”
Use a chocolate shaped egg candy and say “You’re Eggceptional ! Thanks, for all your help!”
Use M&M’ s and say, “I would like to Thank you for your M&M’s. Marvelous and Magnificent help!”

These fun pencils make a perfect center piece for a garden party or a teacher gift! First cut a scalloped circle on top with another smaller scallop on top, then cut out a small circle and stamp with a fun print. You can also, ink the edges of the circle for extra depth. Place in a canning jar with shredded tissue paper. Tie a cute ribbon around the top of the jar.
Halloween Sucker!

Here is a really easy Halloween treat. I took a sucker and then made a topper for it. I took a Quickutz ghost treat bag die that I had and then glued it on to a circle. Next, I glued that onto a Sizzix Circle, Scallop #2 and taped it onto my sucker. Last of all I tied a black ribbon around the sucker stick. It was super easy and fun to make.
Birthday Card!

I love to have homemade cards on hand for when I give away a present. I usually write my note on a sticky note and put that inside the card. Then the card is part of my present and the person I gave the gift to can reuse it if they want. All they have to do is take the sticky note out. Here is a birthday card I made. It was fun to replace the i's in "Big Wish" with balloons!
Cute Butterfly Mobile!
1. Cover an old embroidery hoop with ribbon by looping the ribbon around the hoop tightly and then fasten the end with glue from a glue gun.
2. Next using fishing line or wire (I used a purple wire) to create an x in the center of the hoop. Simple wrap the wire around two sides and then again around opposite sides and you should have an x in the middle of the hoop.
| |
3. Now it is time to make the butterflies. I used a Martha Stewart butterfly punch but you can use any punch you want. You need to punch out 106 butterflies out of your colored paper and then another 106 butterflies out of your clear paper.
4. To string the butterflies use light weight thread or fishing line (I use fishing line, because it is less noticeable). Cut a 25” piece of fishing line. Thread a needle with the fishing line, then thread a clear and colored butterfly in the middle (make sure the colored paper is facing out). Pull the butterfly to the top of your string leaving about two inches at the top. Then, with your needle make a knot in the fishing line so that your butterfly won’t slip. Continue adding butterflies every few inches till you have six butterflies on your fishing line. Make sure your last butterfly is at the bottom of your string.
5. Tie this string to the middle of your x. This should be your longest string.
6. Repeat step four except cut your fishing line to 20” and add 9 butterflies. Tie this string to one of the wires about two to three inches from the middle of the x on one of the sides going towards the hoop. Repeat this step till you have a string tied to each of the arms of the x. This is your inner layer of butterflies.
7. Repeat step four except cut your fishing line to 15” and add 8 butterflies. Tie this string to one of the wires about two to three inches from your 20” string. Repeat this step till you have a string tied to each of the arms of the x. This is your middle layer.
8. Repeat step four except cut your fishing line to 10” and add 7 butterflies. Tie this string to one of the wires next to the embroidery hoop. Repeat this step till you have a string tied to each of the arms of the x. This is your outer layer.
9. Cut four ribbons to the length you want the mobile to hang. Tie the four ribbons to outside of the hoop in each section created by your x and make a large bow to hang up your mobile.

I made these gifts for my daughters teachers as end of the year gifts. I took a plastic cup and filled it with candy and then took a straw and attached the flower to the top. It was super easy to make. You could change what you put on top, like a ghost for Halloween or Candy Cane for Christmas and have a gift for all seasons. I even made one for my sister in law who graduated from high school this year and attached a gift card on top of a straw. Hope you have fun making these


