Jean Minions!


 Up-cycle old jeans into these cute Minions.  My kids seem to have a never ending supply of hole in the knee jeans.  I thought it would be fun to use them to make Minions.  

I just cut around the pockets of their old jeans about ½”.  

Then, going to my stash I found the other materials to build the Minions. Such as the arms and legs.

 I added the facial details with a black permanent marker. 

It is fun to dig into your stash and see what comes out! 
Have fun sewing.

Make your own action figures!


One lazy summer afternoon my son decided to make some new action figure toys out of toilet paper roll tubes.  


He measured a piece of computer paper so it would fit the height and width of the roll.  Then he laid it out and drew and colored his favorite minion.  He then taped it to the toilet paper roll. 


Now he had a new action figure to play with.  He is now collecting paper roll tubes to make more characters.  If your children don’t want to draw their own characters you can use a coloring page of their favorite character instead.  Simply color and then cut out the character and tape it onto the roll so it will stand.  

Halloween Fun!


Make your Halloween Party Spooky fun with canvas paintings. My son’s birthday is the day before Halloween so we decided to throw him a spooky Party.  My sister found these great Halloween designs from the Pottery Barn, but since I was working on a budget she re-produced them by painting on canvas.  They turned out great and were a fraction of the cost!  

We made bean bags out of Halloween print fabric for the pumpkin toss.   


The kids loved putting their hands in the spooky lab and had to guess what they were touching.  If you want to re-create this game here are some ideas for the different items:

  Food item-              Non Food item-

Fingers:       Pretzel Rods         Sticks

Brains:      Marshmallows          Cotton Balls

Worms:    Gummy Worms         Cooked Spaghetti noodles

Eyeballs:   Sour Cherry Candy  Marbles

Have fun being creative!


Pinwheel Quilting Fun!


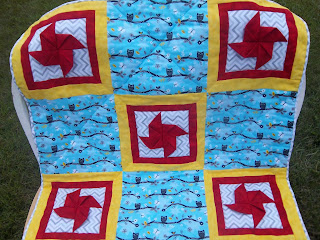
 I love making pinwheel quilts for baby gifts.  I like to sew together 9 12” squares for my quilts.  I picked a really cute flannel print and used that for 4 of my squares and then the other 5 other squares I used a fun pinwheel pattern.  This is my favorite website that teaches you how to make pinwheels. http://www.youcanmakethis.com/articles/post/how-to-make-3-d-pinwheels.htm
They say to use 3 ½” squares, however you can make your squares any size.  

In this quilt my pinwheels are 4” and then I added a red and yellow border to make a 12” square.

From Purse to Pillow!


 This beautiful chevron purse turns into a pillow cover!  The secret is in the straps.   Key rings are used to hold on the straps.  When you want to use it as a pillow cover, simply take off the straps.

 Now slide ribbon into the key rings.  Slid in your pillow and tie the ribbons together.
  

 Make each side of your purse out of different patterns gives you two color choices for your pillow!

Crook Neck Squash Bread!


I have baked, fried, and buttered my crook neck squash and it still keeps coming!  I needed a new way to cook my squash and hopefully get my kids to still eat it.

This bread, a mix between Amish cinnamon bread and zucchini bread was the perfect combination.  My kids loved to eat it and did not realize they were still eating their vegetables.   The use of sour cream makes this bread super moist and as an added bonus it is half the calories.

1 1/4 cups of sugar (divided)
1 t cinnamon
2 eggs
¾ cup of fat free sour cream
1/3 cup of canola oil
1 t vanilla
3 cups of shredded squash
2 cups of flour
1 ½ t baking soda
½ t salt

Preheat oven to 350 degrees.  Grease and flour two bread pans.  In a small bowl combine 1/4 cup of sugar and cinnamon.  Set aside to use later.  In a large mixing bowl combine all the remaining ingredients and mix with a spoon till blended.  Pour evenly into both pans.  Sprinkle cinnamon and sugar mixture evenly over the batter in both pans.  Using a butter knife, swirl in the cinnamon and sugar into the batter.    Cook for 50 minutes or till a toothpick comes out clean.  Let rest for 10 minutes and then dump out onto a wire rack to finish cooling.


 **You could substitute zucchini or carrots for this bread.


Vintage Children On Parade Quilt!


 IF you are looking for a fun mother’s day gift, this quilt is a fun idea.  Each one of the kids holding a flag represents a grandchild.


 I used a boy and girl embroidery pattern that I found online and then changed them a bit to fit into the quilt.  For future grandchildren I plan on adding a second row with vintage kids playing instruments, pulling wagons, or crawling to join in the parade.  Have fun creating your own grand kids quilt!


Lazy Summer Afternoon Quilt!


 Want to know what to do with all those scraps?  I made this blanket using my stash! These cute pinwheel squares are fun to make and measure 6” when finished.  For step by step instructions follow this link:  http://www.youcanmakethis.com/articles/post/how-to-make-3-d-pinwheels.htm


Then, I added fabric till the pinwheel squares measured 12 ½”.  Next, I found this cute Winnie the Pooh Fabric and cut out five 12 ½” squares.


This is a quick and easy blanket to make.  I finished it in one day with the usual interruptions of making lunch and dinner for the family and answering the, “Mommy could you’s…?”

Low-fat Key Lime Lemon Cake!


I wanted a sweet treat without a lot of fat and calories.  After rummaging through my kitchen I found a lemon cake mix and key lime pie yogurt.  I decided to combine the two and a yummy super moist cake was born.  Better yet one slice of cake is only 37 calories!


Ingredients:

1 Lemon cake mix
1 cup of Key Lime Pie yogurt
3 egg whites
1 1/3 cups of water
¼ can of vanilla frosting

serving size:  16

Preheat oven to 350 degrees.

Combine all the ingredients and mix for three minutes. Pour into a greased and floured bunt pan.  Cook for 40 to 45 minutes until a knife in the cake comes up clean.  Let cake cool for 10 minutes.  


Turn out onto a rack and while cake is still warm frost the cake.  It will melt and as it cools will harden on the cake.

Chocolate Peanut Butter Cupcakes with Cream Cheese Frosting!


Having a peanut butter chocolate craving?  These cupcakes hit the spot!

 
Peanut Butter Cupcakes:
1 chocolate cake mix
1 c milk
¼ c peanut butter
3 eggs
Bake according to directions on the back of the box.


Peanut Butter Frosting:
8 oz Cream Cheese
½ c Peanut Butter
2/3 c milk
2 c powder sugar
1 snickers bar cut up into pieces
Cream the cream cheese and peanut butter till smooth.  Add the milk and sugar alternately until frosting is thick and spreadable. 
Spread on top of cupcakes and top with snickers pieces.
Yummy!  Usually I just buy a toy and stick it on top of the cake for my kids birthdays. Ta da! A birthday cake with their favorite character.  This year my son wanted an Angry Bird cake.  I just could not shell out the bucks for a small cheap toy to stick on top of the cake.  I decided to try and make the cake myself.  If your a non decorator this is any easy cake to make.  

You'll need:
1 cake mix (make sure you have eggs and oil since most cake mixes call for these)

1 chocolate frosting can

1 vanilla frosting can

2 round pans

1 red cake mate decorating frosting and star tip

2 Oreo cookies

Instructions:

Make the cake as directed and pour into two greased and floured round pans.  Bake for 30 minutes until a knife poked in the middle comes out clean.

Let the cakes cool in the pan for 10 minutes so the cakes won't stick when you turn them over.

Turn cakes over onto a wire rack to cool. 

When the cake is cool place the one cake top side down on your cake plate. Use the chocolate frosting to frost the top of the cake. 

Place your other layer bottom side down on top of the first cake.  (If both flat ends face each other your cake won't slide and will be less lopsided.  

Use the chocolate frosting to frost the sides of the cake.

Take two Oreo's and separate the two pieces so the cream is on one side.  Use frosting an place on the cake.

Use the vanilla frosting and star tip to make a half circle shape at the bottom of the cake.  Fill the circle in using the star tip.  

With food coloring dye the rest of the vanilla frosting orange.  To make the beak use a star tip and make a triangle between the eyes and another triangle upside down from the first.  Fill in the triangles.

Use the red frosting cake mate with a star tip and decorate the top half of the cake with stars.  

With the chocolate frosting use a straight tip and outline the beak and the top feathers of the bird.  Also, dot the middle of the eyes and outline two eyebrows that cover the top part of the Oreo's.  Use a little water on a knife to smooth out the eyebrows.

Use the remaining orange frosting and add stars around the bottom of the cake.  

Have fun adding any detail to your cake!

star decorating tip    


Angry Bird Cake!


Usually I just buy a toy and stick it on top of the cake for my kids birthdays. Ta da! A birthday cake with their favorite character.  This year my son wanted an Angry Bird cake.  I just could not shell out the bucks for a small cheap toy to stick on top of the cake.  I decided to try and make the cake myself.  If your a non decorator this is any easy cake to make.  

You'll need:
1 cake mix (make sure you have eggs and oil since most cake mixes call for these)

1 chocolate frosting can

1 vanilla frosting can

2 round pans

1 red cake mate decorating frosting and star tip

2 Oreo cookies

Instructions:

Make the cake as directed and pour into two greased and floured round pans.  Bake for 30 minutes until a knife poked in the middle comes out clean.

Let the cakes cool in the pan for 10 minutes so the cakes won't stick when you turn them over.

Turn cakes over onto a wire rack to cool. 

When the cake is cool place the one cake top side down on your cake plate. Use the chocolate frosting to frost the top of the cake. 

Place your other layer bottom side down on top of the first cake.  (If both flat ends face each other your cake won't slide and will be less lopsided.  

Use the chocolate frosting to frost the sides of the cake.

Take two Oreo's and separate the two pieces so the cream is on one side.  Use frosting an place on the cake.

Use the vanilla frosting and star tip to make a half circle shape at the bottom of the cake.  Fill the circle in using the star tip.  

With food coloring dye the rest of the vanilla frosting orange.  To make the beak use a star tip and make a triangle between the eyes and another triangle upside down from the first.  Fill in the triangles.

Use the red frosting cake mate with a star tip and decorate the top half of the cake with stars.  

With the chocolate frosting use a straight tip and outline the beak and the top feathers of the bird.  Also, dot the middle of the eyes and outline two eyebrows that cover the top part of the Oreo's.  Use a little water on a knife to smooth out the eyebrows.

Use the remaining orange frosting and add stars around the bottom of the cake.  

Have fun adding any detail to your cake!

Upscale Old Pants Into a Cute Spring Skirt!


It is that time of year again to change over to summer clothes.  My daughter had some cute sweats that fit great this winter, but like most of her pants they ended up with holes in the knees.  I decided to upscale one of her favorite pair of pants into a cute spring skirt. 


First, cut off the pants you are going to upscale right above the inner leg seam.  Next I bought a ½ yard of the kitty fabric (one of her favorite animals) and a ½ yard of the stripe fabric to match. Cut the kitty fabric on the fold line to get the front and back pieces. Next, folded the stripe fabric length wise and cut on the new fold line to get the front and back border.  

With right sides together sew the one border fabric to the front skirt piece and one to the back skirt piece. (The border fabric may be longer than the skirt front or back pieces.  Cut off the extra fabric to make it even)

With right sides together match the side seams of the front and back of the skirt and sew together. 

 Sew a baste stitch on the top of the skirt.  Gather.  With right sides together and once again matching side seams sew the skirt to the cut of pant top.  Lastly, hem the bottom of the skirt.  Now  a special little girl has her own twirlly skirt!

Bunny Easter Egg Holders!


I remember waking up one Easter morning at my grandma’s house to find this cute bunny in my Easter basket.  I have always loved my Easter bunny.  So, when my kids were asked to participate in a charity bazaar around Easter time, I thought it would be fun to recreate this bunny and fill the Easter egg with candy!  I took my kids to the local fabric store and let them pick out Polar fleece in their favorite patterns.   I bought a ¼ of a yard off of each bolt. 


 I then cut the fleece into rectangles 10” x 12”.  You can make your rectangle smaller of bigger if you want a big or little bunny.


 Next, with right side facing down,  I roledl one corner of the fabric to the middle.  

Then, I turned the fabric and repeated with the other corner.  
Next, I brought both ends together and  pinched the sides about two inches from the end of the fabric.  This will made the ears.

Then, I folded back the fabric about a quarter of the way.  This created the face.

Using a rubber band, I put it around the fabric to hold the face and ears in place.


Next it was fun to make the face.  With glue I add google eyes, a small pom pom nose and tied a ribbon around the rubber band. 


 For a boy bunny I tied the bow on the bottom of the bunny.
  

For a girl bunny  I tied the ribbon on top.


Lastly, I added a cute medium size pom pom  on the back for a tail and filled a plastic egg with candy placing it in the back of the bunny.


My kids loved making these bunnies and already want to make some more!